Repair Genie Garage Door Opener: Step-by-Step Guide
Learn to diagnose and repair common garage door opener issues with clear, expert guidance from Home Repair Guide. This practical how-to covers safety, DIY fixes, maintenance routines, and know-when-to-call-a-pro tips for 2026.

A repair genie garage door opener is a practical, DIY-friendly approach to diagnosing and fixing common garage door opener problems using safe, stepwise methods. It emphasizes safety, simple checks, and clear decisions about repair versus replacement. The goal is to identify whether issues stem from sensors, remotes, or the opener itself, and to outline reliable paths for repair.
Understanding How a Garage Door Opener Works
A typical residential garage door opener consists of three core systems: the power unit (motor), the drive mechanism (belt, chain, or screw), and the control components (sensors, wall control, and remote). When you press a button, a signal activates the motor, which pulls, pushes, or lifts the door along tracks. A beginner can learn the basics of a repair genie garage door opener by understanding where each component lives and how they interact. Most problems originate from power delivery, misaligned sensors, or worn moving parts.
In addition to the motor and drive system, modern openers include safety features such as photocell sensors that detect obstructions and an auto-reverse mechanism. These safety features are essential for avoiding injuries and protecting property. If you’re troubleshooting, start with the simplest potential failure: power. Check that the outlet is live, the circuit breaker is on, and the remote’s battery is fresh. By tracing the signal from remote to wall switch to safety sensors, you can quickly pinpoint the likely source of trouble.
Across DIY channels and homeowner forums, the phrase repair genie garage door opener has become popular shorthand for approachable repairs you can master with the right precautions and tools. The goal is not to “patch-and-pray” but to build a clear picture of what is actually malfunctioning and how to fix it safely.
Common Issues with Garage Door Openers
Garage door opener problems come in several flavors, from a door that won’t move at all to a noisy system that struggles to lift. Common symptoms include the opener not responding to the remote or wall switch, the door jerking, binding, or reversing suddenly, and a motor that hums without moving the door. Misaligned safety sensors, low battery in remotes, worn gears, and dirty tracks are frequent culprits. In some cases, an inexpensive fix—like cleaning tracks or tightening a loose mounting screw—solves the problem. In others, you’ll need to replace worn parts or upgrade the opener.
Another frequent issue is the door going up slowly or stopping short of the full open height. This can point to misadjusted travel limits or a stretched drive belt. If you hear grinding or squealing, the lubrication or bearings may be dry or worn. If the opener struggles to reset after a power interruption, a simple reprogramming or sensor reset can restore normal operation. The key is to approach symptoms methodically rather than guessing.
Safety First: Electrical and Mechanical Precautions
Before you touch any components, disconnect power to the unit to reduce the risk of shock or accidental movement. Do not work on a door with a damaged torsion spring or a damaged track without professional help; springs hold a lot of energy and can cause serious injuries. When in doubt, consult the owner’s manual for model-specific safety instructions. Home Repair Guide analysis shows that most DIY repairs stay within safe boundaries when you avoid high-risk tasks such as adjusting torsion springs, replacing cables under tension, or modifying the motor controls while the door is partially blocked. Always wear safety glasses and keep hands clear of moving parts.
Label all wires if you disconnect anything, and take photos to document how everything was connected. Use a non-contact voltage tester to verify that circuits are truly de-energized before handling wires. If you must lift the door manually, have a helper hold the door in place and never rely on a single person for heavy lifting. Following these precautions dramatically reduces the risk of injury and damage during do-it-yourself repairs.
Diagnostic Checklist Before Repair
Begin with a quick power check: ensure the opener’s outlet is powered, test the wall switch, and try the remote in a different location to rule out a dead battery. Next, inspect the safety sensors—their lenses should be clean and aligned so that the beam is uninterrupted. If the door moves only with the wall switch, the remote or receiver may be at fault. Listen for motor sounds; a humming noise without movement can indicate belt or gear binding. Check the tracks for obstructions, dents, or loose rollers. Finally, test the door balance by disconnecting the operator from the door and lifting it manually; it should stay in place if properly balanced.
If the door drops on release or feels heavy, the springs or balance system may be compromised. In such cases, it’s prudent to contact a professional. A thorough inspection also includes checking the limit switches and, if applicable, resetting the opener’s computer after any adjustment. Document all findings to guide subsequent repair steps and avoid repeating tests.
Essential Tools and Materials You’ll Need
Before you begin, assemble the basic toolkit to reduce stops and starts. You’ll want a screwdriver set with both Phillips and flathead bits, an adjustable wrench, pliers, a non-contact voltage tester, and a sturdy ladder. Keep a clean rag, penetrating lubricant (silicone-based for tracks and rollers), and replacement parts compatible with your model on hand. A smartphone or camera to capture wiring configurations and setup steps will help during reassembly. If you’re unsure about part compatibility, consult your owner’s manual or the manufacturer’s website for model-specific parts. Having these items ready saves time and keeps the project moving safely.
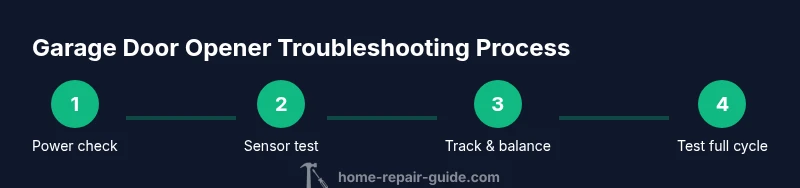
Step-By-Step Troubleshooting Overview
This section provides a concise, action-oriented plan you can follow. Step 1: power down the unit and verify the circuit. Step 2: test the remote and wall switch, noting any latency. Step 3: inspect sensors and alignment, cleaning lenses if needed. Step 4: examine tracks and rollers for obstruction or wear. Step 5: apply silicone lubricant to moving parts and wipe away excess. Step 6: re-test with the door connected to the opener and adjust limits as needed. Step 7: if noises persist, identify whether bearings, gears, or belts are worn and prepare to replace parts. Step 8: reassemble and perform a full cycle test. Tip: document each change and re-test after every adjustment.
Preventative Maintenance to Extend Lifespan
To keep a garage door opener reliable, perform a monthly quick check. Keep sensors clean and aligned, tighten mounting screws, replace worn hardware, and test the auto-reverse mechanism. Annually, inspect the springs and balance, and schedule a professional inspection every 3-5 years to catch wear before it becomes costly. Regular testing keeps your system safe and reduces downtime. Home Repair Guide analysis shows that consistent maintenance reduces downtime and protects family safety.
When to Call a Pro vs DIY Safety Considerations
Many repairs are within reach for a confident DIYer, but some tasks carry risk. If you hear grinding, see frayed wiring, observe a door that is unbalanced, or encounter a malfunctioning torsion spring, stop and call a pro. Electrical work near the opener should follow local codes; if you’re unsure about wiring or capacitor charging, seek professional help. A professional can also re-balance the door, replace worn gears, or install a safety sensor upgrade. Remember: your safety and that of others comes first.
Quick Start Maintenance Routine for Busy Homeowners
Spend 15 minutes once a month to perform a quick maintenance scan. Wipe down tracks, check for loose screws, test the auto-reverse mechanism, and ensure the remote batteries are fresh. Keeping a simple routine reduces the likelihood of major failures and extends the life of your opener. If you missed a month, don’t panic—just perform the next 2-3 quick checks to reset the maintenance cadence.
Tools & Materials
- Phillips and flathead screwdriver set(Phillips #2 and flathead for common screws)
- Adjustable wrench(Use for mounting bolts and track clamps)
- Non-contact voltage tester(To confirm power is off before handling wiring)
- Ladder (6 feet or taller)(Stability is critical for safe access)
- Silicone-based lubricant for tracks and rollers(Apply sparingly and wipe off excess)
- Torque-rated lubricant or grease (optional)(For stubborn joints or gear interfaces)
- Replacement safety sensor or limit switch (model-specific)(Only if you identify faulty parts)
- Camera or notebook for wiring layouts(Helpful for reassembly and documentation)
Steps
Estimated time: 60-90 minutes
- 1
Power down and verify circuit
Unplug the opener and switch off the circuit at the breaker. Use the voltage tester to confirm no live voltage reaches the unit before touching any components.
Tip: Never work on energized components; power isolation is the first safety step. - 2
Test remote and wall switch
Try both the remote and the wall switch to confirm the fault isn’t localized to one control. Replace remote batteries if needed and re-sync after power restoration.
Tip: If the wall switch works but the remote doesn’t, focus on the receiver or battery connection. - 3
Inspect safety sensors alignment
Check that sensor lenses are clean and aligned to create an unobstructed beam path. Misalignment is a common cause of false reversals and non-response.
Tip: Clean lenses with a soft cloth and avoid touching the sensor faces. - 4
Examine tracks and rollers
Look for obstructions, dents, or loose rollers that impede smooth movement. Remove debris and tighten fasteners as needed to restore smooth travel.
Tip: Use a flashlight to spot small obstructions in the track you might miss otherwise. - 5
Lubricate moving parts
Apply a small amount of silicone lubricant to the tracked sections and roller pivots. Wipe away any excess to prevent dust buildup that could attract grit.
Tip: Avoid oily lubricants on plastic parts; they attract dust and gum up components. - 6
Test door balance manually
Disconnect the opener from the door and lift it by hand. It should stay put if well balanced; if it drops, balance springs or tracks require professional evaluation.
Tip: Enlist a helper when manually lifting a heavy door. - 7
Adjust limits and reprogram the opener
If the door travels too far or stops early, adjust the travel limits and reprogram the opener’s logic according to the manual. Test with the door installed.
Tip: Make small adjustments and test after each change to avoid overcorrection. - 8
Final test and decision point
Reconnect the opener, run full cycle, and observe for smooth operation with auto-reverse enabled. If noises persist or parts look worn, plan for replacement or professional service.
Tip: Document changes to reference during future maintenance.
FAQ
What is a 'repair genie garage door opener'?
It refers to a practical, beginner-friendly approach to diagnosing and repairing common garage door opener problems, emphasizing safety and clear steps.
It's a practical, beginner-friendly approach to diagnosing and repairing common garage door opener problems, with emphasis on safety and clear steps.
Can I fix my garage door opener myself?
Yes for many basic issues if you follow safety guidelines and avoid high-risk tasks like spring work. Complex or risky repairs should be handled by a professional.
Yes for many basic issues if you follow safety guidelines. For complex tasks, hire a professional.
What tools do I need for basic repairs?
A basic toolkit with screwdrivers, pliers, a voltage tester, and silicone lubricant is sufficient for most DIY fixes. Check your model’s manual for any model-specific parts.
A screwdriver set, pliers, a voltage tester, and silicone lubricant cover most DIY repairs.
Why won’t my opener respond to the remote?
Start with the battery, re-sync the remote, and check the receiver. If the wall switch works but the remote doesn’t, focus on the remote or receiver.
Check the remote battery and re-sync. If the wall switch works, the remote or receiver may be the issue.
Is lubrication enough to fix noises?
Lubrication helps with dry bearings or squeaks, but persistent noises may indicate worn gears, bent tracks, or failing bearings that need replacement.
Lubrication helps, but persistent noises could mean worn gears or damaged tracks that require replacement.
When should I replace the opener entirely?
If repairs become extensive or safety features are outdated, replacement is often safer and more cost-effective than ongoing fixes.
If repairs are extensive or safety features are outdated, replacement may be the better option.
Watch Video
Key Takeaways
- Diagnose before you repair to avoid unnecessary parts.
- Safety comes first; never work on energized or high-tension components.
- Keep a documented checklist for maintenance and tests.
- Use model-specific parts and consult manuals for accuracy.
- When in doubt, call a pro to protect people and property.