Small Engine Repair Service: A Practical Guide for Homeowners
Learn how to assess, prepare for, and work with a small engine repair service to keep lawn mowers, snow blowers, and power tools running smoothly. practical maintenance, diagnostic steps, and selecting a pro.

Goal: know when to DIY and when to hire a professional for small engines like lawn mowers or snow blowers. For routine maintenance, you can usually handle fuel, air, spark, and carburetor cleaning with a basic toolkit. If the engine won’t start, runs poorly, or makes unusual noises after simple checks, contact a qualified small engine repair service. Safety first.
Why a small engine repair service matters
Small engines power essential outdoor equipment such as lawn mowers, snow blowers, leaf blowers, and portable tillers. When these engines fail, you face downtime, higher repair costs, and potential safety hazards from fuel leaks or sudden starting problems. A professional small engine repair service brings specialized tools, factory-recommended parts, and a trained eye to identify root causes quickly. Home Repair Guide emphasizes that routine, proactive service can extend engine life, protect warranties, and improve fuel efficiency. In this section we explore why investing in a trusted service makes sense for homeowners and renters who depend on reliable equipment. The right shop will offer a clear diagnostic process, transparent pricing, and a written plan before any work begins. By understanding typical service offerings, you can set realistic expectations and avoid sticker shock. Our approach at Home Repair Guide is to help you partner with qualified technicians who respect your equipment and your time, and to provide a framework you can use to evaluate options in your area.
According to Home Repair Guide, a reputable repair service will start with a safety-first assessment, verify fuel and ignition systems, and offer a documented diagnostic plan. This ensures you know what’s being inspected, what parts may be needed, and how long the job will take. You’ll also learn about maintenance tasks you can perform between visits to keep the engine healthy. The goal is to strike a balance between DIY confidence and professional expertise, especially when you encounter unfamiliar symptoms or warning lights. By understanding these fundamentals, you’ll make smarter decisions and reduce the risk of damaging components further.
Quick overview of when to hire a pro and when to DIY
- DIY routine maintenance: air filter inspection, spark plug gap check, fuel stabilization, and general cleaning are suitable for many homeowners with basic tools.
- DIY diagnostics: a simple spark test or carburetor cleaning can be attempted if you’re comfortable and the equipment is cool and safe to handle.
- Call a professional for complex issues: persistent starting problems, poor compression, suspected internal damage, or if you notice fuel leaks or unusual noises.
- Consider warranty and safety: following manufacturer guidelines and using a pro helps preserve warranties and reduces safety risks.
This approach helps you decide quickly whether to roll up your sleeves or pick up the phone. Remember, the Home Repair Guide team emphasizes safety, especially around gasoline, hot parts, and moving blades. A pro can also provide an inspection report that documents existing conditions for future reference.
Tools & Materials
- Socket set (metric and SAE)(8-24 mm, includes deep sockets)
- Screwdriver set(Phillips and flat-head, various sizes)
- Spark plug wrench / gap tool(Assorted plug sizes, includes feeler gauge)
- Carburetor cleaner(Non-chlorinated if possible; avoid damaging seals)
- Fuel stabilizer(Use before storage and during off-season)
- Oil drain pan(For any oil changes or drain tasks)
- Multimeter(For ignition and electrical checks)
- Compression tester(Check cylinder pressure when diagnosing performance)
- Replacement parts (spark plug, air filter, fuel filter)(Only if you know the model and have compatible parts)
- Gloves and safety glasses(Protect hands and eyes from fuel and debris)
- Owner’s manual / model information(Helpful for torque specs and parts compatibility)
Steps
Estimated time: 60-90 minutes
- 1
Power off and secure the engine
Begin by turning off the engine and removing the ignition key if applicable. Disconnect the spark plug boot to prevent accidental starts. Allow the engine to cool before touching any components. This prevents burns and protects you from moving parts.
Tip: Wear gloves and eye protection; work on a stable, well-lit surface. - 2
Inspect safety basics and the surrounding area
Check for fuel leaks, loose hoses, or cracked plastic housing. Remove any flammable liquids from the workspace and ensure ventilation if you’re indoors. Note any unusual odors or signs of overheating.
Tip: Have a fire extinguisher nearby and keep a clean spill pad under the engine. - 3
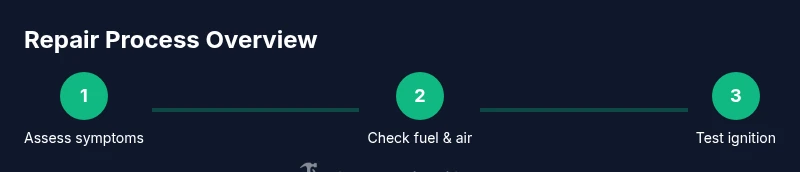
Check fuel and air system basics
Inspect fuel quality and confirm the fuel valve is open if the engine uses an on/off valve. Inspect the air intake and replace or clean the air filter if clogged. Ensure air passages are clear to avoid restricted airflow.
Tip: Use fresh fuel and avoid mixing old fuel with stabilizer-treated fuel. - 4
Test ignition and spark
Disconnect the spark plug wire, then access the spark plug to inspect for wear or fouling. Ground the plug to the engine block and attempt a spark test following the manufacturer’s procedure. A weak or inconsistent spark often points to coil or wiring issues.
Tip: If you’re unsure about ignition timing, do not adjust components—call a pro. - 5
Inspect carburetor and fuel lines
Carburetor buildup is a common cause of starting and running problems. Inspect for varnish, gum, or leaks in fuel lines. Clean or replace clogged jets and ensure fuel to air mixture is appropriate for current conditions.
Tip: Use carb cleaner and avoid forcing parts apart; damage can occur if gaskets are torn. - 6
Perform a compression test
A healthy engine should show consistent compression across the cylinder. Low readings indicate worn rings, valves, or head gasket issues. Compare readings to the service manual’s specifications and note any significant variances.
Tip: If compression is low, avoid running the engine and seek professional assessment. - 7
Decide on DIY vs professional service
Based on your findings, determine whether the issue can be resolved with basic maintenance or requires a professional diagnostic. Complex issues like low compression or broken components usually need a shop visit.
Tip: Document symptoms, photos, and the steps you took to help the technician diagnose faster. - 8
Prepare for service appointment
If you’ll be sending the unit to a shop, gather the engine model, serial number, and a clear description of the problem. Remove personal items from the vicinity and secure any hazardous components. Confirm warranty coverage and take note of the expected turnaround time.
Tip: Ask for a diagnostic plan and written estimate before any work begins.
FAQ
What qualifies as a small engine?
Small engines are gasoline-powered machines used in lawn equipment and portable tools. They require periodic maintenance and can benefit from professional service when problems arise.
Small engines power lawn mowers and other tools; they need regular maintenance and expert help for complex issues.
How long does a repair typically take?
Turnaround varies with the issue, parts availability, and shop workload. Minor tune-ups can be quick, while carburetor or engine repairs may take longer.
Repair times depend on the problem and parts; some jobs are quick, others need more time.
Do I need to drain fuel before service?
Shops often advise draining fuel for safety or to prevent contamination. Always follow the technician’s instructions to avoid spills.
Let the shop guide you on fuel draining so you don’t risk spills or damage.
Should I bring replacement parts or let the shop supply them?
Many shops supply standard parts, but you may be asked to provide original parts or model information to ensure compatibility.
Most shops supply parts, but you might need to provide model details.
What warranty should I expect on repairs?
Most reputable shops offer a limited warranty on parts and labor. Confirm coverage terms before work begins.
Ask about warranty terms and duration before approving repairs.
Can I perform maintenance between service visits?
Yes, routine maintenance like cleaning or replacing filters can be done safely if you follow guidelines and use proper safety gear.
You can do basic maintenance between visits with care.
Watch Video
Key Takeaways
- Schedule professional help for complex symptoms.
- Document symptoms and diagnostics before service.
- Prioritize safety and follow manufacturer guidelines.
- Keep maintenance records for future visits.