Washer Dryer Repair: Safe, Practical DIY Guide
Learn safe, practical washer dryer repair with Home Repair Guide. This guide covers diagnosing common faults, essential tools, step-by-step fixes, maintenance tips, and when to call a pro to extend the life of your laundry appliances.

According to Home Repair Guide, washer dryer repair doesn't have to be risky—it can be practical and budget-friendly. Looking to tackle washer dryer repair safely and effectively? This guide helps you diagnose common faults, perform practical fixes, and decide when to call a pro. You’ll learn a practical diagnostic checklist, cover drainage, balance, door latch, and heating issues, plus cost-saving tips. By following Home Repair Guide’s trusted approach, you can restore performance, protect your appliance, and minimize downtime.
Understanding Washer Dryer Repair: What This Guide Covers
Washer dryer repair is less mysterious than it seems when you break the task into steps you can manage. Whether you own a compact apartment unit or a family-sized laundry setup, common failure modes overlap: drainage clogs, unbalanced loads, worn door latches, defective belts, and heating or motor faults. This guide keeps the language practical and avoids guesswork, focusing on observable symptoms, safe diagnostics, and reliable fixes. According to Home Repair Guide, regular inspection and proactive maintenance can reduce outages and extend the life of laundry appliances. We’ll outline a repeatable diagnostic approach, the essential tools you’ll need, and the fixes that deliver real results without requiring specialized equipment. You’ll also learn how to decide when a part should be replaced versus when it makes sense to retire a stubborn unit, and how to budget repairs so your laundry routine stays on track. Throughout, you’ll encounter clear explanations of terms like pump, filter, interlock, drum seal, and valve assembly, so you can interpret service manuals and error codes with confidence. Washer dryer repair becomes a practical skill you can apply to keep clothes clean and costs down.
Common Failures and How to Diagnose Them
While every washer and dryer model has quirks, the most frequent breakdowns fall into a few predictable categories. A washer may fail to agitate or spin due to a faulty lid switch, broken belt, or a jammed coupling. Drainage problems are usually caused by clogged filters, kinked hoses, or a defective pump. Leaks point to worn door seals, loose hose connections, or a damaged tub seal. Dryers can overheat if the vent is blocked or the lint filter is full, and a dryer may not heat if the heating element or thermostat is defective. Start diagnostics with visual checks: listen for unusual noises, observe the load during the spin cycle, and look for error codes in the console. Use a process of elimination: confirm power and water supply first, then test subsystems like the pump, belt, coils, and interlock. Document any codes or symptoms to track what you’ve tested and what remains uncertain. This method reduces unnecessary replacements and helps you collect information that a repair shop would expect when you eventually seek professional help. In all cases, safety comes first—unplug the unit before poking internal components and avoid working with wet hands.
Safety First: Prep and Best Practices
Safety is the foundation of any washer dryer repair. Before you touch the appliance, unplug it from the wall and shut off the hot and cold water supply if you’ll be manipulating hoses. Move the unit away from the wall to access rear panels, and lay down towels or a tray to catch water. Wear eye protection and gloves when handling sharp metal edges or copper fittings. Keep a dedicated work space clear of children and pets, and never operate the machine with access panels removed. If you’re testing electrical components, use a non-contact voltage tester and keep metal tools away from live terminals. Read the user manual for model-specific cautions, especially around high-voltage elements and steam hazards. When dealing with gas-powered dryers, refer to local codes and consider professional service for venting work. After each diagnostic step, confirm that power is fully disconnected and that any water filtration parts are reassembled correctly to prevent leaks during a test run. This foundation reduces risk and yields more accurate results as you proceed with washer dryer repair.
Essential Tools and Replacement Parts
Having the right toolkit makes all the difference in a successful repair. For most common faults, you’ll want a basic set of hand tools: a Phillips and a flat-head screwdriver, a nut driver, pliers, a multimeter, and a flexible flashlight for tight spaces. A small bucket, towels, and a cloth will help you manage spills. If you anticipate components replacement, keep spare hoses, clamps, door interlock switches, and a pump or belt if your diagnosis points to those parts. When ordering parts, note the exact model number and the error codes you’ve observed; compatible replacements vary by brand and series. A good practice is to test electrical resistance with a multimeter and inspect the pump and filter for debris before purchasing replacements. Finally, secure a service manual or model-specific guide so you can verify the correct torque on screws and avoid damaging plastic housings during reassembly. With these tools and parts on hand, you’re ready to tackle most washer dryer repair tasks.
Maintenance Habits to Prevent Future Breakdowns
The best way to avoid frequent washer dryer repair is to implement simple maintenance habits. Regularly clean the lint screen in dryers and inspect the vent hose for kinks and obstructions. For washers, run a monthly cleaning cycle or a hot-water rinse with a cup of white vinegar or washing machine cleaner to remove soap scum and mineral deposits. Check hoses for bulges or leaks and replace them every 5–7 years or sooner if you notice wear. Level the unit to prevent excessive vibration that can loosen fittings over time. Use balanced loads to minimize strain on the drum and drive components, and avoid overloading the drum with heavy items. If you notice an error code, consult the manual to interpret it accurately before replacing parts. Finally, log maintenance tasks and part replacements in a simple notebook—this helps you spot patterns and plan budget-friendly repairs before a small issue becomes a major fault. With consistent upkeep, washer dryer repair becomes a proactive part of home maintenance rather than a reaction to emergencies.
When to Replace Versus Repair
Not every malfunction is worth chasing with a repair. If a critical component—such as the motor, drum seal, or main control board—fails repeatedly, replacement may be more economical than ongoing fixes. Evaluate the age of the unit, repair costs versus new purchase price, and the frequency of breakdowns in the past year. A compact, efficient model may deliver long-term savings through lower energy and water use, even if upfront costs are higher. Also consider compatibility with smart-home features and warranty coverage; a new appliance can offer better reliability, energy efficiency, and service support. If you decide to repair, plan for a staged approach: replace one part at a time, test thoroughly, and avoid partial reassembly that could create hidden issues. Home Repair Guide recommends balancing practical constraints with the environmental and financial implications of repair versus replacement. For many homeowners, a measured, data-informed decision leads to the best outcome for washer dryer repair and overall household resilience.
Authority Sources
For credibility and further reading, explore trusted sources on appliance safety and efficiency. Visit Energy.gov for energy-saving laundry tips, the FTC for consumer information on repair practices, and Energy Star guidelines for energy-efficient washers and dryers. These resources help you make informed decisions and compare repair versus replacement options with confidence.
Tools & Materials
- Multimeter(Test for voltage, continuity, and resistance as needed)
- Screwdriver set (Phillips & flat-head)(For screws in panels and terminal covers)
- Nut drivers / pliers(For hose clamps and fittings)
- Tongue-and-groove pliers(Helpful for stubborn hoses)
- Bucket and towels(Contain and absorb water spills)
- Replacement hoses (if needed)(Keep spare hose and clamps on hand)
- Door interlock switch (if applicable)(Only replace if diagnosis confirms a fault)
- Pump drive belt (if applicable)(Check model compatibility before purchasing)
- Model-specific service manual(Verify torque specs and wiring diagrams)
- Safety gear (gloves, eye protection)(Wear during all disassembly steps)
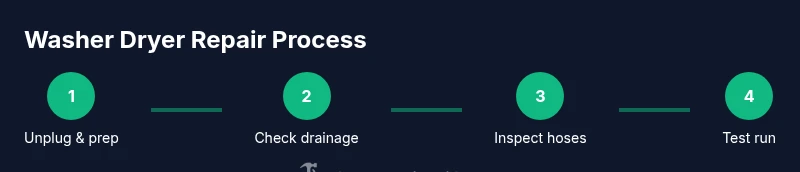
Steps
Estimated time: 60-90 minutes
- 1
Unplug and prep the area
Power down the unit completely by unplugging it. Move the appliance away from the wall and place towels to catch any residual water. Confirm you have access to shut-off valves if you will touch hoses.
Tip: Label cords and hoses before disconnecting to simplify reassembly. - 2
Inspect the drain system
Check the drain pump and filter for clogs or debris. Remove any obstruction carefully and test the pump by pressing the test button if available. Reassemble if clean and return to service mode.
Tip: A clogged filter is the #1 drain problem; clean thoroughly but don’t bend hoses. - 3
Check hoses, clamps, and seals
Inspect all water inlet and drain hoses for cracks, bulges, or leaks. Tighten clamps firmly but avoid over-tightening that could damage fittings. Replace worn hoses as needed.
Tip: Loose clamps are a frequent cause of leaks; replace if you hear sloshing during operation. - 4
Test door latch and interlock
A faulty door switch or interlock can prevent operation. Use a multimeter to check continuity and ensure the door engages the switch when closed. Replace if faulty.
Tip: If the washer won’t start but there’s power, the door switch is a common culprit. - 5
Observe the drive system and motor
Listen for grinding or belt slippage. If the drum doesn’t rotate, inspect the belt (where applicable) and the motor coupling. Replace worn parts based on your diagnosis.
Tip: Do not force the belt; align pulleys and check for debris before reassembly. - 6
Run a test cycle with no load
After reassembling, plug in the unit and perform a test cycle with no clothes to ensure there are no leaks and all functions operate normally. Monitor for error codes and unusual sounds.
Tip: If a fault code appears, consult the manual to interpret it correctly before replacing parts.
FAQ
What are the most common signs a washer or dryer needs repair?
Look for no agitation or spin, failure to drain, leaks, unusual noises, or persistent error codes. Start with power, water supply, and visible hose checks before deeper diagnostics.
Common signs include no agitation, failure to drain, leaks, and error codes. Start with power and water checks before deeper diagnostics.
Can I fix a washer that won't drain without moving the machine?
Yes. Begin with the pump filter and the drain hose for clogs. If the pump runs but water remains, you may need to access the internal pump or check the belt on certain models.
Yes. Start with the pump filter and drain hose for clogs, then check the pump if water remains.
Is it safe to repair a gas-powered dryer myself?
Gas dryer repairs involve gas lines and venting. It’s safer to rely on a licensed professional for venting or other gas-related tasks and follow local codes.
Gas-related work is risky; consult a licensed pro for venting or gas components.
Should I proactively replace hoses on an old washer or dryer?
If hoses show wear, bulges, or cracks, replacement is prudent even before a leak. Proactive hose replacement reduces the chance of a flood and saves time.
Replace worn hoses early to prevent leaks and floods.
How do I know if I should call a professional?
If you face repeated failures, electrical concerns, or you’re unsure about any step, a professional service can prevent damage and ensure safety. Use the guide to assess symptoms and escalate when needed.
If failures persist or you’re unsure, call a professional for safety and reliability.
Are repair parts expensive for a washer or dryer?
Replacement parts vary by model; compare the part cost to a new unit’s price and energy efficiency. The guide helps you estimate costs and determine if repair is cost-effective.
Costs vary; compare part price with new unit price to decide.
Watch Video
Key Takeaways
- Prioritize safety; unplug and shut off water before any work.
- Diagnose via symptoms, not guesses to avoid unnecessary parts.
- Use correct tools and model-specific manuals to prevent damage.
- Balance repair vs replacement based on age and cost.
- Document tests and results for future maintenance.