Ice Maker Repair Frigidaire: How to Fix Common Issues
Learn to diagnose and repair common Frigidaire ice maker issues with practical, home-friendly steps. Safe troubleshooting, water supply checks, component testing, and guidance on replacement vs. professional service.

By following this guide, you’ll diagnose and repair common Frigidaire ice maker issues with confidence. You’ll learn safe troubleshooting steps, how to verify water supply, identify faulty components like valves or solenoids, and when to replace parts rather than rework the unit. This approach emphasizes practical, home-friendly fixes that homeowners and renters can perform with basic tools, all aligned with Home Repair Guide’s trusted guidelines.
Understanding Frigidaire ice maker issues
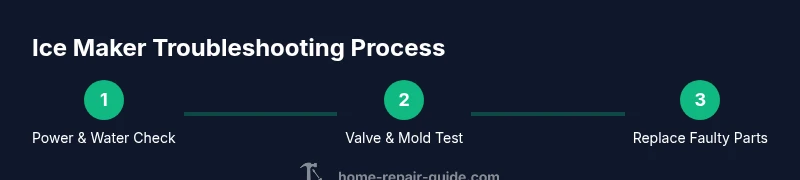
Frigidaire ice makers in modern kitchens deliver convenient ice, but when they stop producing or start dispensing oddly, it can disrupt daily routines. Before assuming a failure, start with symptoms: no ice, uneven cube size, slow production, frost buildup, water leaks around the ice maker, or an ice dispenser that jams. Many problems trace back to three areas: the water supply, the ice mold/heater assembly, and the control mechanism (motor, micro-switch, or thermostat). This guide from Home Repair Guide walks homeowners and renters through a practical, safety-first approach. According to Home Repair Guide, diagnosing ice maker problems begins with verifying power and water supply, then inspecting the ice mold and heater for frost or cracks, followed by testing the valve and sensors. A systematic method reduces unnecessary part replacements and helps you decide when a professional service is warranted.
Tip: Keep notes and photos of symptoms to compare after any repair attempt. This makes it easier to track what fixed or didn’t fix the issue when you revisit the problem later.
Tools and safety for ice maker repair
Before you touch the appliance, unplug the fridge and turn off the water supply. Wear safety glasses and work on a clear, dry surface to prevent slips. Gather the essential tools and materials in advance so you won't pause mid-task. A well-lit work area reduces the chance of misidentifying parts. Use towels or a shallow tray to catch any water as you disconnect lines. This section lists the most common tools needed for Frigidaire ice maker troubleshooting and the reasons you’ll use them. Following a safe step-by-step process protects you, the appliance, and your floors during repairs. Safety comes first: if you’re ever unsure, pause and consult a professional.
Brand note: The Home Repair Guide team emphasizes documenting your setup before disassembly and reassembly to avoid miswiring.
Diagnostics workflow for Frigidaire ice makers
Begin with a simple power and water check, then observe the ice maker's fill and harvest cycle. If ice fails to form or ejects slowly, inspect the water inlet valve for obstructions or kinks in the supply line and verify that the water line is fully open. Frost buildup around the mold suggests heater or thermostat problems, while freezing around the freezer compartment hints at airflow or defrost issues. Use a multimeter to test heater resistance and thermostat continuity, and verify the ejector arm moves freely. If you hear clicking from the valve but see no water, the coil or valve may be faulty. The goal is to test each subsystem in sequence, documenting results with photos for reference. See diagram in Step 4 for wiring layout. Home Repair Guide recommends restricting power during testing to reduce shock risk.
Replacing common components (valve, heater, mold thermostat)
When tests point to a faulty component, replacement is often more cost-effective than extended troubleshooting. The water inlet valve is a frequent culprit; replace it if the valve doesn't click and shows high resistance or intermittent flow. The ice mold heater or thermostat can fail to release ice or prevent freezing, respectively; measure resistance or continuity with a multimeter and compare to a known-good part. Ensure you purchase the correct Frigidaire ice maker replacement parts for your model by cross-referencing the model number on the unit’s label. After replacements, reassemble and slowly run a few test cycles to confirm proper operation and to catch leaks early. If you’re unsure, pause and consult a professional to avoid over-repair.
Maintenance and prevention tips
Regular maintenance reduces the likelihood of future failures. Clean the ice mold and replace water filters as recommended by the manufacturer. Inspect the water line for kinks and ensure connections are snug but not overtightened. Schedule a monthly check of the ice maker’s operation and keep a spare parts kit handy. Keep the freezer at a steady temperature to minimize frost buildup and ensure the mold is at the correct cycle. The goal is to keep the ice-maker system clean, dry, and properly powered so it can perform reliably.
Safety and when to call a professional
Repairing an ice maker involves electrical components and water lines; if you notice burning smells, unusual heat, or visible water leaks, power off the fridge and call a licensed technician. If repeated DIY attempts fail to restore proper ice production, a professional service can diagnose hidden faults and avoid further damage. For many homeowners, choosing professional support preserves warranty eligibility and ensures safe handling of refrigerant-related issues. The Home Repair Guide team recommends balancing DIY fixes with expert evaluation when the problem persists beyond straightforward valve and heater issues.
Authority sources
For safety and standards related to appliance maintenance, consult authoritative guidance from trusted sources. Energy information and safety guidelines from the U.S. Department of Energy, the Consumer Product Safety Commission, and Federal Trade Commission can help you approach repairs responsibly and safely. These sources provide general best practices for appliance care and consumer protection when performing DIY repairs.
Tools & Materials
- Multimeter(Test heater and thermostat resistance; check continuity)
- Flathead and Phillips screwdrivers(Sizes #0 to #2 for covers and fasteners)
- Nut driver / socket set(Remove mounting screws of ice maker)
- Pliers (needle-nose and channel-lock)(Handle clamps and hoses)
- Torx driver(Optional for some Frigidaire models)
- Flashlight(Inspect dark compartments and wiring)
- Towel or shallow tray(Catch water and keep work area dry)
- Replacement parts kit(Only after diagnosing valve, heater, or thermostat)
- Isopropyl alcohol wipes(Clean contacts and connectors)
- Protective gloves(Safety while handling sharp edges)
Steps
Estimated time: 60-120 minutes
- 1
Power down and access the ice maker
Unplug the refrigerator and, if needed, shut off the water supply. Remove the ice maker cover to expose mounting screws and internal wiring. Keep screws in a labeled container and take photos before removal to aid reassembly.
Tip: Label each wire connector with tape for easy reconnection. - 2
Check water supply and valve
Inspect the water line for kinks and confirm the shutoff valve is fully open. Listen for the valve click when the fridge attempts to fill; if you hear nothing, test for continuity with the multimeter and prepare to replace the valve if the coil shows high resistance.
Tip: Run a short fill cycle to confirm water delivery after reassembly. - 3
Inspect ice mold and heater system
Look for frost or ice build-up around the mold and heater. Use a flashlight to inspect for cracks. Test the heater for proper resistance and the thermostat for continuity with the multimeter.
Tip: If frost is present, defrost and re-test after a short cooldown. - 4
Test the ejector arm and micro-switch
Manually cycle the ejector arm to ensure it moves freely and releases ice. Check the micro-switch for proper engagement when the arm returns to its home position. A stuck switch can halt the harvest cycle.
Tip: Lubricate gently if the arm feels sticky and re-test. - 5
Evaluate and replace faulty components
If tests show a malfunctioning valve, heater, or thermostat, replace with a model-compatible part. Always verify compatibility with your Frigidaire model number. Re-test all functions after installation.
Tip: Avoid mixing incompatible brands; use genuine or OEM-equivalent parts. - 6
Reassemble and run test cycles
Reconnect power and run multiple complete ice-making cycles to observe fill, freezing, and ejection. Check for leaks and confirm consistent ice production across cycles.
Tip: Document results with photos for future reference.
FAQ
What are common Frigidaire ice maker problems?
Most issues involve water supply, frost on the mold, or a failed heater/thermostat. Start with checking the water line and valve, inspect the mold, and test core components before replacing parts.
Common Frigidaire ice maker problems usually involve water supply issues, frost around the mold, or heater/thermostat failure. Start with the water line, then inspect the mold and test components.
Can I fix a jammed ice maker myself?
Yes, if you can safely access the mechanism and perform basic tests. Always unplug first and follow a step-by-step diagnostic process to avoid over-repair.
Yes, you can try with unplugging first and following a careful step-by-step diagnostic process.
When should I replace rather than repair?
If multiple components fail or the unit is older, replacement may be more cost-effective. Compare part costs and expected lifespan with professional service.
If several parts fail or the unit is old, replacement may be cheaper and more reliable.
How long does a typical DIY ice maker repair take?
Most DIY repairs take about 1 to 2 hours, depending on access to parts and the complexity of the fault.
Usually one to two hours for a DIY repair.
Is water leakage during repair dangerous?
Yes. Shut off the water supply and unplug the unit to minimize risk. Use towels to manage drips and prevent slips.
Yes, turn off water and unplug; use towels to catch drips.
Does warranty cover Frigidaire ice maker repairs?
Warranty coverage varies by model and region. Check your manual or contact the manufacturer for specifics on covered parts and services.
Warranty varies by model; check your manual for coverage details.
Watch Video
Key Takeaways
- Diagnose using a structured flow before replacing parts.
- Verify water supply and mold/heater integrity first.
- Test components with a multimeter to avoid guessing.
- Replace only the faulty part and re-test thoroughly.
- Know when to call a professional to protect warranty and safety.