Concrete Repair Near Me: A Practical Homeowner Guide
Learn how to find reliable concrete repair near me, assess damage, choose DIY vs professional options, and perform safe repairs with step-by-step guidance and practical tips.

Quickly, you will learn how to locate trusted local concrete repair near me services, evaluate crack severity, and decide when to hire a pro versus DIY patch. You’ll learn a standard pre-job checklist, key questions to ask contractors, typical materials, and essential safety practices to minimize disruption and cost while restoring durability. This quick answer sets the stage for the deeper steps below.
Why concrete repair near me matters and what to expect
According to Home Repair Guide, finding concrete repair near me means more than proximity—it means reliable workmanship that stands up to climate, freeze-thaw, and heavy loads. Local contractors understand local soils, water drainage, and typical slab thickness, which reduces surprises. When you search near me, expect three typical outcomes: cosmetic crack patching, resurfacing for worn surfaces, and structural repairs for supported slabs. A reputable local team will inspect drainage and slab base, assess moisture, and provide a scoped plan with a timeline and warranty options. For small residential patches, you may only need a patch kit, but for larger cracks, a pro assessment ensures safety and long-term durability. You’ll also want a clear written estimate and clear communication about cure times and traffic restrictions. According to Home Repair Guide, this proximity-based approach often yields quicker service calls and better follow-up support. The Home Repair Guide team notes that checking licenses, insurance, and local references improves confidence before you sign a contract. This sets expectations and helps prevent common repair delays.
Signs you need repair
Concrete deterioration rarely improves on its own. Look for hairline cracks that widen over time, spalling (chips breaking off from the surface), Z-shaped or diagonal cracks, and any area that appears to be sinking or settling. Loose edges around a slab, doors that stick, or water pooling after rain can indicate drainage issues underneath. If you notice moisture stains or efflorescence, address the root cause first (drainage and base stability). By recognizing these indicators early, you can prevent more extensive damage and higher repair costs. Home Repair Guide analysis shows that early detection typically leads to simpler repairs and longer-lasting results. If a crack runs through a load-bearing section or you see horizontal movement, stop DIY work and consult a professional for a structural assessment.
DIY vs professional: when to patch yourself or hire a pro
Cosmetic cracks in driveways or patios are often suitable for DIY patching with epoxy or polyurethane-based fillers. Small patches can be done with a patching compound and a trowel after proper cleaning. However, cracks that seem to widen, slabs that have settled, or areas near foundations require a professional assessment to ensure structural integrity and proper load-bearing support. Hiring a local expert can also help you navigate permits (if required), drainage corrections, and appropriate curing times. The Home Repair Guide team recommends weighing labor costs, material quality, and warranty terms when deciding. DIY can save money on small fixes, but a pro brings long-term durability and a documented warranty that protects your investment. If in doubt, start with a professional inspection to determine the scope of work and then decide on DIY follow-ups for minor maintenance.
Common repair methods and when to use them
Crack filling is ideal for hairline cracks where surface integrity remains intact. Epoxy injections or polyurethane foams seal the crack and restore stiffness, with polyurethane offering more flexibility for movement. For worn or spalled surfaces, resurfacing or overlay patches can restore a uniform finish. If slabs have settled, mudjacking or foam leveling can raise sunken areas and restore slope for proper drainage. In some cases, full-depth repair or resurfacing is warranted to maintain structural safety and appearance. Each method has its own curing time and surface preparation requirements, which a contractor will tailor to your climate and concrete type. The key is matching the repair method to the underlying cause (moisture, base instability, or load) rather than blindly patching cracks. Home Repair Guide encourages homeowners to verify that contractors recommend a method based on a thorough assessment rather than quick fixes.
Materials, tools, and planning
Before you begin, assemble the essential tools and materials and confirm safety gear. Use high-quality patch compounds, bonding agents, and crack fillers designed for your concrete type. You’ll need cleaning tools (wire brush, broom, vacuum), a chisel or angle grinder for aggressive cracks, a trowel, mixing buckets, and a concrete bonding agent. If injecting injections, you’ll require a compatible epoxy or polyurethane kit, along with proper PPE. Plan for weather windows with dry conditions and moderate temperatures to ensure proper curing. Keeping a written plan with a scope of work, timeline, and cure times helps you stay on budget and meet expectations. The Home Repair Guide team emphasizes documenting the project start and end dates, and maintaining a quick reference list of questions for your contractor.
How to choose a contractor: questions to ask and checks
When evaluating contractors, start with licensing, insurance coverage, and a written estimate. Ask about their method recommendations, warranty terms, and a sample project timeline. Request references and contact previous clients to verify quality and reliability. Confirm that the contractor will handle drainage considerations and base stability in the scope of work. Check that they comply with local codes and whether permits are required for larger repairs. For transparency, gather multiple bids to compare material choices and cure times. Home Repair Guide suggests prioritizing near-me providers who offer clear communication, a detailed written plan, and a warranty that covers both materials and workmanship.
Safety and prep: getting the site ready
Safety comes first. Clear the area, remove vehicles, and shield adjacent surfaces to prevent spills. Wear eye protection, gloves, and a respirator if using epoxy or filling agents. Ensure proper ventilation if working indoors or in enclosed spaces. Weather considerations matter: avoid patches during rain or extreme heat, and plan for curing windows that accommodate temperature fluctuations. By preparing the site with care, you reduce cleanup time and protect people, pets, and landscaping. The Home Repair Guide team highlights that proper site prep minimizes safety risks and produces cleaner, longer-lasting repairs.
Authority sources
- OSHA: Construction safety guidelines for concrete work and chemical handling (https://www.osha.gov)
- NIST: Materials properties and testing standards related to cement and concrete (https://www.nist.gov/topics/concrete)
- Extension services: Practical guidance on crack repair and overlays from land-grant universities (e.g., https://extension.illinois.edu)
Tools & Materials
- Chisel and hammer(Widen cracks and remove loose concrete)
- Wire brush and stiff broom(Clean debris from crack surfaces)
- Vacuum or shop vac(Suck out dust and powder after brushing)
- Concrete patch compound or epoxy resin kit(Choose based on crack size and movement)
- Polyurethane foam injection kit (optional for movement)(Use if movement is present)
- Concrete bonding agent(Improves adhesion of patch material)
- Mixing bucket and paddle mixer(Prepare batches as needed; avoid excess material)
- Trowel and margin trowel(Finish patched areas flush with surrounding surface)
- Level and straightedge(Check for level evenness during patching)
- Personal protective equipment (gloves, goggles, respirator)(Follow product safety data sheets)
- Water spray bottle(Dampening surface can help patch adhesion in hot weather)
Steps
Estimated time: 2-6 hours (plus curing 24-48 hours)
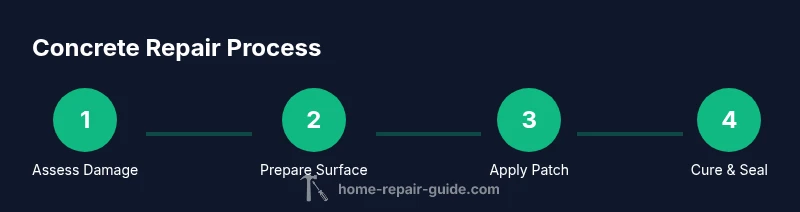
- 1
Assess the project
Visually inspect the damaged area, document crack width, and note any drainage issues. Take photos for reference and measurement. Decide if DIY patching is appropriate or if a pro is needed for load-bearing cracks.
Tip: Create a quick sketch of the area and mark the worst spots to guide your repair plan. - 2
Prepare the site
Clear the surrounding area, remove loose debris, and protect nearby surfaces. Wear PPE and ensure good ventilation if using epoxies. Dampen surfaces if the patch material requires it, but avoid standing water.
Tip: Use plastic sheeting or drop cloths to protect driveways, plants, and sidewalks. - 3
Mix and apply patch material
Follow product instructions to mix bonding agents and patch material to the recommended consistency. Apply into the crack or low spot with a trowel, pressing to remove air pockets. Smooth the surface to align with surrounding concrete.
Tip: Work in small batches to prevent early setting; avoid overfilling cracks. - 4
Cure and seal
Allow the patch to cure as specified by the manufacturer. Keep the area dry and free from traffic during cure windows. Apply a concrete sealer if recommended to protect against moisture and freeze-thaw cycles.
Tip: Mark cure times on your calendar and plan to recheck after 24–48 hours. - 5
Inspect and maintain
Once cured, inspect for any new movement or cracking. Seal any minor cracks that reappear promptly. Schedule periodic maintenance to extend the life of the repair and address drainage as needed.
Tip: Take a photo at one-month intervals to track any changes.
FAQ
When is a crack considered structural and requires a professional evaluation?
Cracks that are wide, growing, or show signs of slab movement (such as doors sticking or uneven floors) should be evaluated by a licensed contractor. Structural issues can affect load-bearing capacity and safety.
If cracks are wide, growing, or the slab seems to be moving, get a professional evaluation.
How long does concrete repair typically take from start to finish?
Most patches can be completed in a few hours, but curing times vary by product and weather. Plan for up to 24-48 hours before normal use returns, plus longer if sealing is required.
Most patches cure within hours, but full use restores after a day or two depending on the product.
Can I patch concrete in cold or hot weather?
Extreme temperatures affect curing. In cold weather, curing may take longer; in hot weather, curing can happen quickly and require shade and water misting. Follow product guidelines for temperature ranges.
Temperature affects curing; follow product guidelines and avoid patching during extreme heat or freezing.
What should I ask a contractor before hiring?
Ask about licensing and insurance, warranty terms, the proposed method, expected cure times, and references. Get a written estimate with line-item costs and a timeline.
Ask about licensing, warranty, method, cure times, and references before hiring.
Is DIY repair cost-effective for most cracks?
DIY can be cost-effective for small, cosmetic cracks, but larger cracks or movement often require pro materials and expertise. Consider long-term durability and warranties when weighing options.
DIY can save money for small cracks, but larger issues usually benefit from a professional repair.
What maintenance helps extend a repair's life?
Keep drainage proper, seal exposed surfaces, and recheck annually for new cracks. Addressing issues early reduces the chance of recurrent damage.
Keep drainage clear, seal surfaces, and inspect yearly for new cracks.
Watch Video
Key Takeaways
- Identify whether DIY patching or a pro is needed first.
- Prepare the area and choose the right repair method for the crack.
- Follow curing times and safety guidelines to ensure durability.
- Document the project for warranties and future maintenance.
- Prioritize proper drainage and base stability to prevent recurrence.