Repair Antenna Arc Raiders: A Step-by-Step Guide
Learn how to repair antenna arc raiders with a practical, safety-first approach. This Home Repair Guide tutorial covers diagnosis, parts, and a durable, step-by-step repair process for reliable performance in 2026.

According to Home Repair Guide, you can repair an antenna arc raiders by safely inspecting the antenna system, reseating connectors, replacing damaged coax, and testing the signal. This quick guide covers safety steps, the essential tools, and the core repair steps you’ll perform at home. Follow the steps carefully to restore performance and avoid further damage.
Understanding the task: repair antenna arc raiders
The term 'antenna arc raiders' refers to an arc-shaped antenna system commonly used for long-range reception in certain setups. For homeowners, the goal is to keep the signal clean, the hardware intact, and the system safe to operate. According to Home Repair Guide, many trouble calls stem from simple issues that can be resolved without replacing the entire antenna. In this section we describe what an arc-raised antenna is, the typical failure modes, and how to approach repair methodically. Start with a daylight inspection: look for obvious signs of wear, corrosion on fittings, cracked insulation, or bent metal that could disrupt the beam. If you can't see obvious damage, move to electrical tests.
The core principle is to isolate the problem along the signal path: power supply, feed line, connectors, and the receiving device. Home Repair Guide's analysis shows that starting at the source of power ensures you don't chase phantom faults downstream. For many readers, the first fix is to reseat or tighten a loose connector; if that doesn't help, proceed to more substantial repairs such as replacing a degraded coax run or damaged connectors. Throughout this guide, we emphasize safety, proper identification of parts, and using the right tools. By maintaining a calm, repeatable approach, you reduce risk and improve the odds of a durable repair that lasts through seasonal weather.
Safety considerations and basic protections
Before touching any electrical components, you must shut down power to the entire system and verify that devices connected to the antenna are de-energized. Wear non-conductive gloves, eye protection, and avoid jewelry that could snag or conduct electricity. Secure the area to prevent accidental contact and ensure the ladder or mounting system is stable. These steps minimize the risk of shocks, short circuits, or falls. The Home Repair Guide team recommends removing batteries from nearby devices to prevent accidental power on during inspection. Keep a flashlight handy and work in dry conditions to avoid moisture-related shorts that can compromise both safety and signal integrity.
Diagnosing common symptoms and tests
Common symptoms of a failing antenna arc raiders setup include intermittent signal, complete loss of reception, or visible corrosion along connectors. Start with a visual inspection of the feed line, connectors, and mounting hardware for cracks, splits, or bent metal. If the exterior looks intact, perform a continuity check with a multimeter to confirm there is a proper path from the feeder to the receiver. Listen for crackling or buzzing that may indicate interference or loose shielding. Remember to test after each adjustment to track what changes the signal quality. Based on Home Repair Guide analysis, systematic testing reduces the risk of overhauling working components and keeps repairs focused.
Repair options: repair vs replace components
Decide whether to repair or replace portions of the feed line. Damaged coax, corroded connectors, or cracked insulation are typically repairable, but excessive wear toward the transmission point may necessitate a full coax replacement. If the mounting hardware is bent or sun-damaged, refurbishing the mast or replacing the mount ensures solid grounding and reduces wobble during wind storms. Use weatherproof connectors and heat-shrink insulation to preserve signal quality and shield connections from moisture. In many situations, a targeted connector replacement or short coax splice is enough to restore performance without a full overhaul.
Reassembly and test verification
After installing new connectors or cable, reassemble the system carefully and confirm the pathway is secure and properly grounded. Reconnect the receiver and power up the unit, then measure signal strength and verify stability over several minutes. Take notes on each test result to compare against your baseline. If the signal improves but then degrades with motion or weather, re-check mounting and shielding for micro-movements that could disrupt the beam. The aim is a stable, repeatable signal across a range of environmental conditions, not just a single moment of peak performance.
Maintenance and long-term care
To extend the life of an antenna arc raiders system, implement routine inspections seasonally and after severe weather. Inspect the feed line for cracking or wear, replace aging weatherproofing, and ensure all connections are snug but not overtightened. Keep the area around the antenna clear of debris to prevent corrosion and misalignment. Regular testing—at minimum twice a year—helps you catch issues before they escalate, preserving signal quality and reducing the chance of a costly repair later. By adopting a simple maintenance schedule, you protect your investment and maintain reliable reception.
Tools & Materials
- Digital multimeter (continuity and voltage checks)(Set for continuity; test between coax ends and at power supply outputs)
- Screwdrivers (Phillips and flat)(Flatten heads for low-profile connectors)
- Coaxial cable (matching type to existing system)(Have spare length equal to 1–2 meters)
- Coax connectors (F-connector, BNC, or as specified)(Keep compatible with your feed line and receiver)
- Heat shrink tubing(Use heat gun to seal and insulate)
- Electrical tape and weatherproof sealant(Seal outdoor connections against moisture)
- Cable cutters/strippers(Assists with neat coax terminations)
- Gloves, safety glasses, non-conductive footwear(Personal protective equipment)
- Non-conductive ruler or tape measure(Helpful for consistent strain relief)
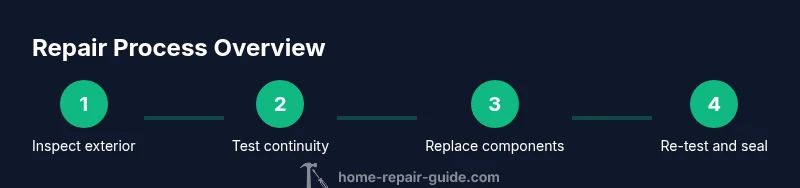
Steps
Estimated time: 60-90 minutes
- 1
Power down and disconnect equipment
Shut off all power to the antenna system and detach the receiver, amplifier, and any inline power supplies. Confirm there is no residual voltage on exposed conductors with a non-contact tester if available. This prevents shock and ensures safe inspection.
Tip: Double-check that any outdoor power devices are switched off and unplugged before touching wires. - 2
Inspect physical condition of feed line and connectors
Carefully examine the coax for cracks, punctures, or kinks. Look at all connectors for corrosion, bent pins, or loose fittings. If you see damage, mark it for replacement and keep the area clean during handling.
Tip: Use good lighting and wear gloves to avoid damaging delicate shielding. - 3
Test continuity and path integrity
Set the multimeter to continuity mode and test from the feed point to the receiver input. A broken path or high resistance indicates a defective segment or loose shielding. If continuity fails at any point, replace the affected section or connector.
Tip: Document readings for future reference and compare after each repair. - 4
Replace damaged components
Install new coax and/or connectors as needed. Ensure theconnector type matches the system and use heat shrink around every joint. Avoid bare conductors that could short or corrode in outdoor environments.
Tip: Fan out the shield evenly and avoid sharp bends that can degrade signal. - 5
Reassemble and secure the mounting
Reattach the feed line and mount, making sure the antenna is stable and grounded. Reconnect the receiver and any inline power devices. Ensure there is no movement that could loosen joints over time.
Tip: Use strain relief and weatherproof seals to reduce movement and water ingress. - 6
Test and validate performance
Power up the system and observe signal strength across several weather conditions if possible. If performance is inconsistent, revisit connectors and shielding, then re-test. Keep notes for future maintenance.
Tip: Test after each major adjustment to isolate the cause of any fluctuation.
FAQ
Is professional help required for antenna arc raiders repairs?
Most repairs to low-voltage coax and outdoor connectors can be done by a confident homeowner following safety protocols. If you encounter mains electricity, high voltages, or damaged structural mounting, consult a licensed electrician or antenna technician.
Most repairs are okay for a confident homeowner with safety steps, but contact a licensed professional if you deal with mains power or damaged mounting.
What is the most common failure in these repairs?
Loose connections and damaged coax are among the most frequent issues. Regularly inspect the connectors for corrosion and ensure the feed line is free from cracks.
Loose connectors and worn coax cables are the usual culprits; inspect these first.
How can I improve signal quality after repair?
Verify proper alignment, ensure robust weatherproofing, and minimize interference from nearby electronics. Re-test after each change to confirm improvements.
Align, weatherproof, and minimize interference, then test again to confirm.
What safety gear should I wear during repair?
Wear gloves, safety glasses, and non-conductive footwear. Keep jewelry away from any exposed conductors and avoid working on a wet surface.
Gloves, glasses, and non-conductive shoes keep you safe, and remove jewelry before starting.
How long should a repair last under normal conditions?
Durability depends on weather, installation quality, and maintenance. In typical conditions, a well-done repair should remain stable across seasons with proper care.
A well-done repair can last across seasons with good maintenance.
Watch Video
Key Takeaways
- Power down and verify conductors before touching wiring
- Replace damaged connectors and use weatherproofing
- Test signal after each adjustment to verify repair
- The Home Repair Guide team's verdict: prioritize safety, document steps, and seek professional help if high voltage or unknown damage is involved